Shooting Realistic HDR Images
May 6, 2014 by Timothy Cooper
 HDR imagery can be considered a recent fad or a well-worn technique, depending on how you look at it. In the early days, film failed to produce visible detail in the highlight and shadow areas of high-contrast scenes. Because of this, photographers resorted to difficult and tedious darkroom techniques to help return the detail to the print.
Today’s digital sensors, while holding great promise, still fall short of the capability of our vision. Luckily for us, however, modern computer programs provide a more accurate and elegant solution to this age-old high-contrast problem.
The acronym HDR stands for High Dynamic Range and in photography, it typically refers to the technique of taking multiple photographs with the intention of blending them together in an HDR program.
The phrase ”dynamic range” refers to the amount of separation (or range) between the brightest and darkest parts of a scene. A scene with high dynamic range would have a huge difference between the highlight and shadow values. High contrast is a more commonly used phrase to describe scenes with high dynamic range.
The problem with film and digital sensors is that neither is capable of providing a realistic image in these high-contrast situations. If you expose correctly for the shadow area, the bright highlight areas become overexposed. If you expose properly for the highlight area, the shadows become underexposed.
The HDR technique, then, is to take multiple photographs at different exposures, each capturing a different range of detail. You can then import them into an HDR program such as PhotoMatix and blend them into one photograph that contains full shadow, midtone and highlight detail.
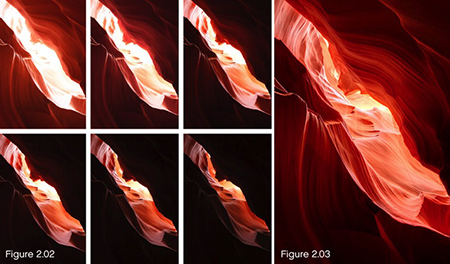 Here is a visual example of six shots created to blend together in HDR. Figure 2.02 shows the images. Note that the brightest image shows plenty of shadow detail, and the darkest images retains highlight detail. Figure 2.03 shows the final combined image.
Shooting for HDR is not always necessary but should be considered whenever the scene’s brightness range exceeds the camera’s ability to capture it. It is more than just setting your camera on Aperture Priority, Evaluative metering, and Auto-Bracketing and firing off a few shots. Care should be taken to analyze the scene and set your camera accordingly.
Shooting for HDR boils down to making a series of exposures that capture the full range of tones present in the scene. The simple way of doing this is to get one good exposure for the highlights and then open up one stop (add more light via the shutter speed) and make another exposure. Then open up again and make another exposure. Continue this until all of the shadow areas are captured.

Pro Tips
Here are a few tips that may help you achieve better results in the field:
1. Find the important bright area when metering. Not every bright area in the scene needs detail, typically light sources can do without. It’s also unreasonable to expect to get detail from the bright sun. The main idea is to keep larger, important bright areas from blowing out.
2. Don’t concern yourself with the blackest black. Most images benefit from a pure black somewhere in the scene so determine which areas are truly important.
3. HDR software has the ability to blend together images that are not perfectly aligned, but it takes it longer to produce the final results. If the images are too far out of alignment, however, the software may not be able to achieve perfect registration. It’s best to use a tripod and a cable release or remote. A tripod will also allow the use of smaller apertures for more depth of field and help keep your images sharp by reducing camera shake.
4. Consider using your camera’s continuous shooting mode to capture a series of exposures in rapid succession and eliminating subject movement in between shots.
5. Many scenes don’t require exactly three, five, or seven-stop brackets. They might need four or six. In these cases it’s easier to set your Auto-Bracketing to capture more images than are necessary and delete the unnecessary images back at the computer.
6. Shoot in RAW as these files contain much more information than JPEG files. More image information allows more options when it comes to blending your images together. HDR programs will process JPEG files, but for the most latitude in processing, shoot in RAW.