10 Tips for Sunrise and Sunset Shots
April 27, 2022 by Marie Joabar
The weather's getting warmer and it's much easier to be out photographing in the early morning and late evening. If you enjoy sunrise or sunset shots, here are some tips that can help.
 1. PLAN - Scout the location in daylight so you get the lay of the land and know where to set up for sunrise.
2. BEFORE, DURING, AFTER - Plan to be in place about an hour before sunrise so you can capture the beautiful pre-dawn color. Watch as the black sky fades to a deep blue and shortly after, to a pinkish purple, then to a brilliant orange and yellow just minutes before the sun rises. Just after sunrise, turn around and capture the scene in front of you bathed in the warm sunlight.
At sunset, enjoy the warm glow for about an hour prior to sunset and then make sure to stay in place for about 45-60 minutes following sunset to capture the dramatic post-sunset color.
 3. COLOR SETTINGS - The White Balance setting in your camera can help accentuate the early morning or evening hues. During pre-sunrise, try Incandescent or Tungsten to blue up the sky. As the sky gets lighter, try Florescent to add a rosy hue. Once the sunrises, try the Daylight setting for natural color. Otherwise, use the Auto White Balance setting.
4. EXPOSURE - Capturing a sunrise and sunset works better in manual exposure mode instead of aperture or shutter modes. In those modes, the camera meter tries to render everything as neutral and as a result, your images may be too dark or too light.
If using an auto mode, see if the camera offers a Sunrise or Sunset setting. This should give you beautifully saturated color in the sky and might help prevent overexposure.
Exposure Settings for Sunrise in Manual Mode (using a tripod):
- Set the ISO to 400 to start and as the sky gets brighter, adjust it to 200 or 100. Reverse the order for sunset.
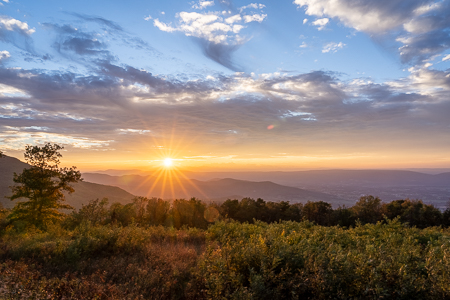
- Set the aperture to f16 or 22 to capture the sun’s rays like a starburst. If photographing before sunrise or after sunset, adjust the aperture for the depth in your scene. F8 is usually a good starting point.
- Leave the ISO and aperture set, then as the sky brightens, adjust the shutter speed until you have the desired brightness in your image. (Making it faster will make the image darker, slowing it down will make it brighter.)
5. FILTERS - Consider using a split or graduated neutral density filter just before and after the sun rises over the horizon to prevent overexposure in sky. This filter has a dark area on the top half to control the light in the sky and prevent overexposure.
6. DYNAMIC RANGE - Another option is to bracket the exposures to capture all the tones from bright to dark. Take a series of either 3 to 5 photos each 1 stop apart depending on the dynamic range before you (the range from bright to dark). These can later be merged together with editing software such as Lightroom or Photoshop.
7. CLOUDS - Slightly cloudy conditions are ideal and will make your images more colorful. A clear sky is not as colorful or dramatic.
 8. FOREGROUND INTEREST - Having a foreground subject can add interest for the viewer and can help make a stronger composition. A farmhouse, church steeple, an interesting patch of trees, or a city skyline, etc, can be used to strengthen your composition. There are many spots in the area to shoot from, just try to avoid a large tree line, or skyscrapers that might obscure the sun as it rises/sets as you’ll lose the golden rays while waiting.
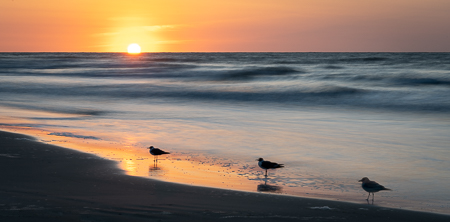
9. SILHOUETTES - This is a great time to capture striking silhouettes! With the subject backlit, expose for the bright sky and your subject will be underexposed. Subjects that work well for this can be anything with a definable shape, people, buildings, a city skyline, etc.
10. CAMERA MOVEMENT - Get creative, before the sun rises or sets, use camera movement for some fun frames. You’ll need a slow shutter speed so that you have time to move the camera while exposing. Depending on how bright it is, a neutral density or polairing filter may be necessary to prevent overexposure. 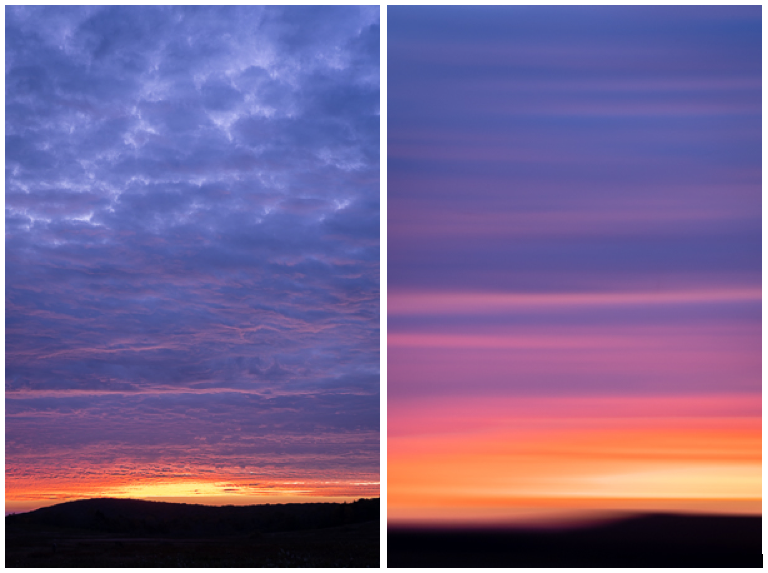 The image on the right (above) was shot during a 1 second exposure while moving the camera sideways.
11. APPS - Use an app such as The Photographers Ephemeris (TPE) or Sun Seeker. TPE shows the direction of the sun rise/set based on your chosen location so it helps you plan the best spot to shoot from. It also tells you the twilight, sunrise and sunset times.
As with any type of photography, the more you practice the stronger you'll get. Plus, there's nothing like learning from your own personal experiences so whether your photos are good or just okay, are winners or mistakes, keep at it and continue learning and perfecting!