An 8 Step Photo Workflow
June 15, 2017 by Admin
When it comes to photography, most of us just want to take our photos and then share them with our friends, family or clients as quickly as we can. With an efficient workflow in place we’ll be able to do just that and then get back in the field quicker for more shooting.
In terms of photography, a workflow is a way of working which encompasses setting up your camera, taking photos, downloading and saving them in a safe place, editing and exporting them for their final use. The idea behind a workflow is creating a simple and standardized way to work to minimize mistakes and utilize your time better.
This 8 step workflow list can help you create or improve your own workflow.
1. Setting Up Your Camera
Making sure your camera is set up for what you’re going to be shooting will save you a lot of time on the back end. The main things to check are exposure, focus and color.
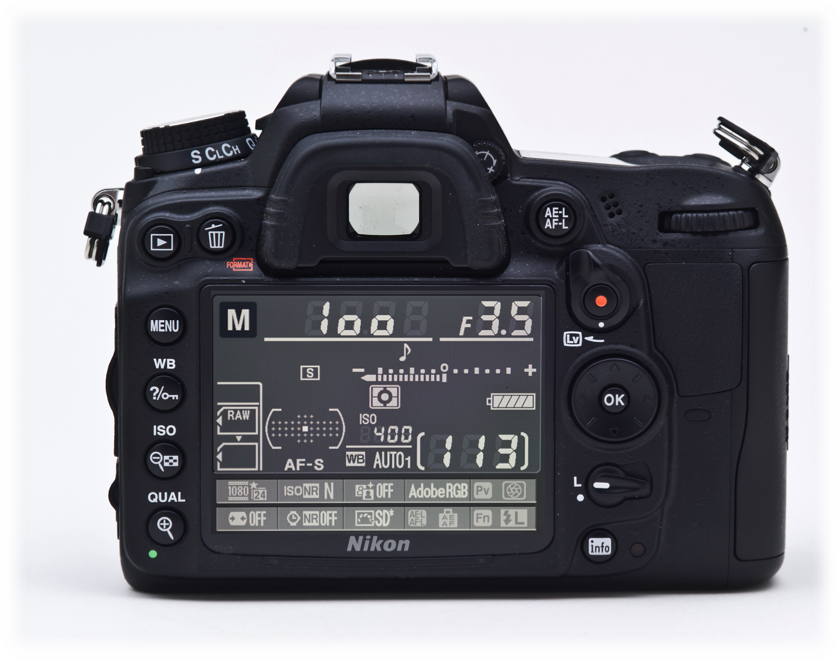 Exposure – Using the Histogram or Highlight Alert allows you to see if you have a good exposure before you leave the scene and reduces the amount of editing you’ll have to do back at your computer. These settings can be found in your Playback menu.
Auto Focus settings
Focus Mode
- Use Continuous (AF-C) for sports or to track subjects in continuous motion.
- Use single shot focus otherwise (AF-S).
Focus Area
- Locate and activate focus point selector and select the point you want to be in focus.
Zoom into your image in the Playback mode to check for sharpness.
Color settings– Capturing images with the right White Balance and no color cast will also save you time on the back end. Additionally, having to correct a color cast is quite difficult if you’re shooting in the JPEG format so make sure to check this before shooting. To correct a color cast in a Raw capture is as simple as moving the color temperature slider in editing software.
Color space – This refers to the range of colors your camera can capture.
- Using Adobe 1998 captures a greater range of colors and is what you should use if printing yourself and you’re color managed.
- Use SRGB as the color space if you’re not printing your images. This is the default on just about all cameras.
Raw or JPEG – The format you choose will impact your workflow. Raw images require you to process the images before you can share online or print. Lightroom and Photoshop are 2 software programs you would use for this.
If shooting in JPEG format, you’re able to share those images instantly without having to process them first.
For more information about whether you should shoot in RAW or JPEG, check out our previous blog post- http://capitalphotographycenter.com/blog/article/jpeg-or-raw-which-is-right-for-you
2. Deciding Where to Store Your Photos
Give serious consideration to where you want to store your images. Think long term, as your collection of images grows will your storage system grow with you?
– Computer Hard Drive – If you are using a desktop with a large internal hard-drive, you may wish to store your files on it so they are all in one place and easy to find. However, once your drive is more than half full, your computer’s performance and its speed will slow down considerably. This could make using editing programs or even everyday computer activities, such as checking email, much slower.
– External Hard Drive – These offer a lot of flexibility and allow easy access to images stored there without slowing down the computer. They’re easy to travel with and they can be purchased in different sizes. You can always upgrade to a larger hard-drive or add additional drives if they start filling up.
3. Transferring Photos
There are a few ways to transfer photos to your computer but one of the most important things to remember is to transfer them right away! This will help you avoid making silly mistakes, such as deleting images on your camera that you had never transferred but forgotten about.
It’s best practice to download images using a card reader rather than connecting your camera via it’s USB cable as that’s slower and uses the camera’s battery. Spend a little extra money on a card reader and get a good brand. Cheap card readers can cause problems with your memory cards and it can be a painful fix if that happens. There are many brands to choose from but some of our favorites are Lexar, Sandisk and Delkin.
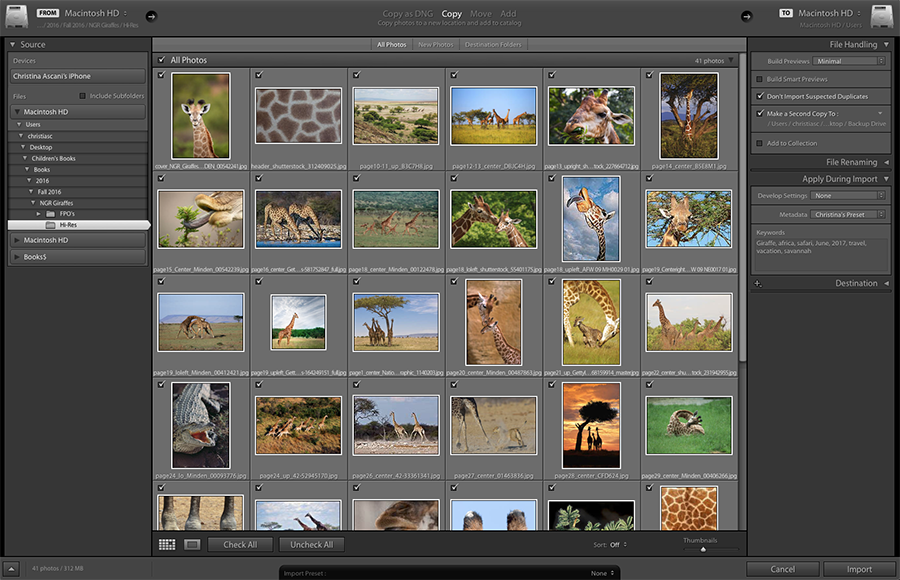
Copy your files from memory card using Adobe Lightroom. Lightroom is the industry standard for organizing and editing and one of the nice things about it is that you can tag images with keywords, apply metadata and even push some editing presets on the images during import.
Adding keywords is an important step so you have the ability to search for images in the future. Take a minute and add them on import, you’ll thank yourself later.
4. Organizing - Folder Structure and File Naming
Organize your images in a way that makes sense to you. Throwing them loose into one big ‘Images’ folder is not a good workflow. Instead, consider creating folders;
- Based on subject matter - landscapes, flowers, people, food, sports, etc.
- Based on location. If you travel a lot, you could create folders based on country, state or a point of interest like a national park.
Note - If you use location or subject matter, your folders will fall alphabetically, not chronologically.
- Based on year and month. You can have a large ‘2017’ folder and then break that down into smaller month folders. Within those month folders, have the date and location of where that particular shoot was.
- Based on a date format such as YY/MM/DD descriptive word (170615 Rays birthday). With this system your folders will fall chronologically.
What’s most important is to create folders and organize in a way that will work for you. If you remember taking a picture based on the location, that might be the best way for you to organize. If you are more of a dates person, work that way.
Here is an example of my workflow (Christina), where I sort images based on subject matter and date.

I breakdown my images based on the things I shoot, which are mainly weddings and portraits. Within the ‘Weddings’ folder, I’ll break things down by year. In the year folders, I break them down further by date and the name of the couple. Within that ‘couple’ folder, I have a folder for my RAW images and the FINAL images that I shared with the client. I use the green labels available on a Mac to delineate that I looked at, edited, toned and shared the images with the client.
5. Post Processing
Now that you have organized your photos and they are imported to your favorite photo application like Adobe Lightroom, it’s a good time to sift through and edit your photos.
It’s always good to delete images that are bad, blurry or out of focus.
Next, pick out your favorite shots. Lightroom has many ways to sort images, such as using stars, color labels or flags. Usually stars are used to rate images while colors are used to categorize them. A 4-star image could identify your best photos, a 2-star image could have some potential but might need more editing work than a 1-star image, etc.
Once you pick out your favorite photos, you can then edit them, this can include tweaking the exposure, adding contrast, adjusting the white balance, adding a vignette, etc. Editing is really a personal and artistic preference. Lightroom’s Develop Module offers a wealth of tools from basic to advanced for toning and image editing as does Photoshop.
6. Exporting
Once your images are edited and look the way that you want, you’ll want to create a final copy of it in a format appropriate for your application.
– If printing photos, the printing company may ask for a specific file format like a TIFF file or they may want a JPEG sized to a certain dimension. Be sure check with them for their specifications.
– If you’re going to share the images online in an email, a blog or on Facebook for example, you would choose JPEG as your file format because it’s the most universally read. Sizing images to less than a megabyte is ideal for online sharing (640 to 1000 pixels on the long side) and since our computers can’t display more than 72 pixels per inch that’s what we should use.
7. Backing Up your images
Regardless of whether you’re storing your images on your computer’s internal hard-drive or an external drive, you should have a backup system in place. Hard-drives, internal or external, can and will fail so having a backup is essential. If one drive fails, your images will be safe on the other.
Some of our favorites backup programs are Carbon Copy Cloner, Carbonite, Sync, Back Blaze, ChronoSynch and SynchBack. If you’re going to use one of these, just make sure it’s compatible with your platform (Mac or Windows) and operating system.
One last tip- along with backing up your images, it’s also important to remember to back up your Lightroom catalogue! The catalog is a record of all your work in that program and you definitely don’t want to lose that.
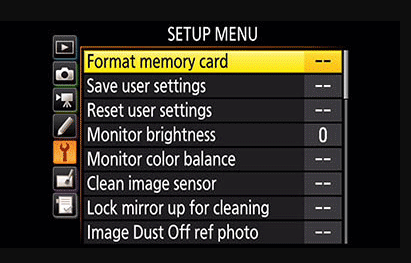
8. Formatting your Memory Cards
It’s usually best to format your cards once you downloaded your images and have a second backup copy. Formatting is different than deleting as formatting sets up your memory cards to receive and store files on a clean slate, it’s like giving your car a luxury wash. Formatting helps eliminate card errors and is known to extend the life of your cards.
Clearing the cards right after downloading and backing up saves you the worry not being 100% sure if you have the photos already downloaded and saved somewhere safe.
As a photographer, it’s extremely important to have a consistent workflow. Without following the same steps, you can come across a myriad of problems, the worst being loosing precious images! Take some of the tips from this post and think about what makes sense to you and then implement it!