Camera Sensor Cleaning Options
January 23, 2020 by Marie Joabar
 If you have a digital interchangeable lens camera, chances are at some point you’ll come across sensor dust. You’ll first notice it as little spots in the same place on all of your pictures. More an inconvenience than anything else, if not removed from the sensor, you’ll spend time removing it from your photos when editing.
Take precautions to minimize the amount of dust getting inside your camera and prevent having to clean the sensor as often.
- Keep a lens on the body at all times (unless it's packed for long distance traveling). There's no need to remove the lens when you're not using it or you're storing in your camera bag. Instead, leave your favorite lens attached so you don't have to open and expose the inside of the camera each time you use it and then put it away.
- Dust or pollen on the exterior of the body can easily work its way into the camera or lens and land on your sensor. When you’re done shooting outdoors and with the lens still attached to the camera, wipe down the exterior of your camera and lens using a lint free cloth. Wipe the front of the lens with a separate lens cloth or a lens brush so as not to scratch the glass or coatings.
- When changing lenses;
- Power off the camera to prevent the static electricity from pulling dust particles in.
- Turn the opening in the camera towards the ground to prevent anything from falling into the camera.
- If you are outdoors, and especially if it is windy, try to shelter your camera as best you can when changing lenses.
No matter how careful we are, dust inevitably works its way into the camera and finds a home on the sensor. We may not always see it in our photos because the dust particle may be in a darker area of the frame, it's much easier to see when it is in a brighter or smoother area like the sky. It’s also more visible on photos taken with a small aperture, f16 or 22, than those taken with a large aperture, f4 or 5.6.
If you see dust as you look through your viewfinder, you’re simply seeing dust on the mirror which isn’t a problem… until it moves further into the camera.
Many DSLR cameras have self-cleaning sensors that shake a bit when the camera is powered on or off which is designed to make the dust particles fall off. Although this is very helpful, don’t rely on it to keep your sensor free of dust or dirt. Sometimes humidity or moisture in the camera causes dust particles to adhere to the sensor, and sometime oil from the shutter or mirror splatters on the sensor. No amount of shaking will remove these spots. 

To check your sensor for dust or dirt follow these steps;
- Use a longer focal length - 70 to 100mm should work fine).
- Set your camera to its lowest native ISO (avoid the Lo 1 or Lo 2 settings).
- Set your Aperture to f16 or f22.
- Over expose the shot by a stop or two. (If using Program, Aperture or Shutter mode, use the Exposure Compensation setting to over expose).
- Manually focus to infinity.
- Take a photo of a white piece of paper, a light colored wall or even a plain blue sky.
- Download the image, open it with your software and enlarge it on the screen - magnify to 100%. Any dust specs and particles should be visible.
- To get a better view of the spots, open Lightroom, go to the Basics panel in the Develop Module and move the Black slider toward the negative. In Photoshop, use the Levels adjustment and move the black and white sliders under the graph to line up with the edges of the mountain in the graph. (See photo)
Note that with DSLRs, the images are flipped as they are reflected off the mirror to the viewfinder; the dust you see on the bottom of the downloaded image is really on the top portion of the sensor.
Another way to check for dust or dirt is to buy the Delkin Sensor Scope. This is like a loupe that fits over the camera opening and has a light to shine on the sensor allowing you to see any spots.
If you've found dust, consider these 4 options to clean the sensor.
1. Blow out the dust with a blower bulb.
2. Use a sensor brush to collect the dirt.
3. Use sensor pads and solvent to wipe the sensor (only take this step for stubborn and stuck dirt.)
4. Skip the “Do it Yourself” route and have it professionally cleaned. Take your camera to a local dealer who can clean it or send it to the manufacture for cleaning. This may take a couple of weeks so plan accordingly.

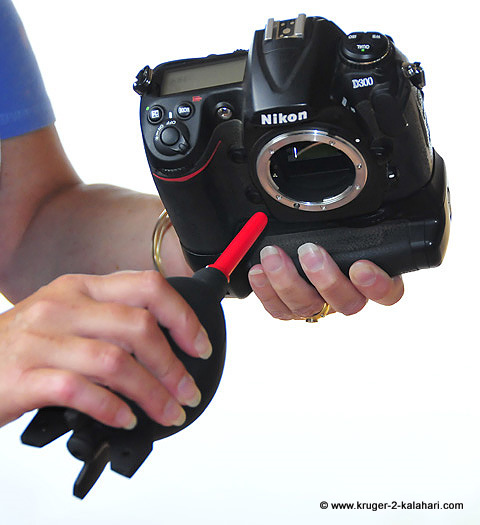
1. Start with the safest and easiest tool to use, the blower bulb.
- With a fully charged battery or better yet, with AC power, choose “clean image sensor” from the camera’s menu. In most cameras, this will raise the mirror and expose the sensor behind it.
- Holding the camera with the opening facing the floor, use a blower bulb and ‘blow’ out any dust being careful to keep the tip of the bulb outside of the camera body. Do not use canned air, it is too powerful and it can leave a residue.
- Take another test shot of white paper or sky and see if you’ve gotten the dirt off.
- If not, you can attempt further steps to clean it yourself and many people do, just use extreme care. If you are not good with your hands or are clumsy, you shouldn’t - let the professionals do it for you. Many people have ruined their camera sensor by using the wrong techniques and/or the wrong products for cleaning.

2. If you choose to continue cleaning, the next step would be to use a sensor-cleaning brush with static-charged bristles. The bristles attract particles off the sensor – similar to a magnet attracting metal. “Visible Dust Arctic Butterfly” is a popular brush and is battery powered. Prior to using it, spin the bristles to charge them and then very lightly brush the sensor. Do not spin it while it is inside the camera. Having your camera on AC power is a must for this type of cleaning.
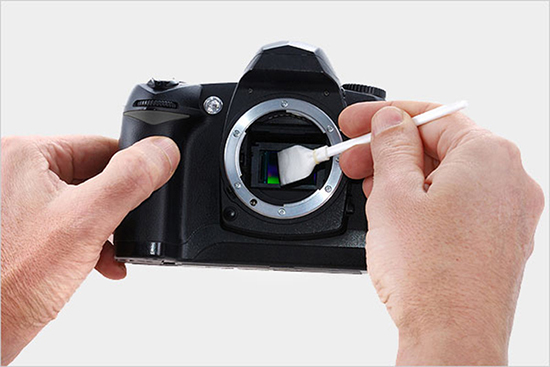
3. If that fails to remove everything, your next step would to be to wipe the sensor with a sensor swab moistened with only one or two drops of solvent. One can find pre-moistened swabs or use swabs with a solvent like Sensor Clean for stuck particles, or a solvent like Smear Away for oil spots caused from the shutter or mirror. Again, AC power is a must.
Some common problems from this type of cleaning are:
• It’s possible to brush thru a spot of oil from the shutter or other sticky substance and smear it across the sensor.
• Using too much solvent and causing streaks.
• Not wiping to each edge and leaving dirt along the sides of the sensor.
4. Have it professionally cleaned. Most of the local camera stores can help you with this either by performing the service themselves or sending if off for you. For a list of local stores, visit our Resource page.
If you are not going to have the sensor professionally cleaned and are going to do it yourself, it’s best to first visit the manufactures website for a tutorial on using their products as well as your camera manufacturer’s recommendations. The information at this website http://www.cleaningdigitalcameras.com is a great resource and contains many helpful recommendations. Read through it before deciding whether to clean the sensor yourself or let the pros do it for you.
Reducing the opportunities for dust to enter the camera will certainly help but no matter how careful one is, dust will find its way in and land on your sensor. Depending on how you use your camera, the sensor may need cleaning once a year, once a week or once a day. How you clean it is your choice.
This article is not a “How To” by any means and if you choose to clean the sensor yourself you are doing so at your own risk and we accept no liability.
More resources:
Information about products by Visible Dust such as the Sensor Brush, Sensor Swabs, Sensor Clean and Sensor Smear can be found on their website http://www.visibledust.com/
Information about Giotto bulb blowers and pre-moistened sensor swabs can be found here, http://photosol.com/