Creative Captures with Camera Movement - Swipes, Swirls, Zooms and More
May 19, 2022 by Marie Joabar
Photographing with intentional camera movement has become so popular and at our classes we’re often asked how to do it. It’s a ton of fun so if you haven’t already tried it, I encourage you to give it a shot!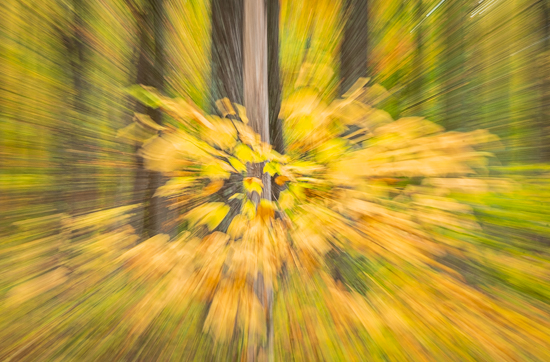
In a nutshell, we’re using a long exposure and moving the camera while shooting. This gives you a very creative and abstract looking image.
Many years ago my good friend and one of our instructors, Karen Messick, showed me how to do this. We were in a beautiful forest in West Virginia and after a few vertical swipes framing the tall trees, I was hooked. Years later, I took a workshop with Bryan F. Peterson and I learned how to shoot swirls (which is now my favorite) and also learned blending Multiple Exposure of the same scene. To this day I still think of Karen and Bryan whenever I am shooting with these techniques. 
These techniques help me to mix things up and exercise the creative side of my brain. And I love sharing it at my classes. Students love it and are always so excited to see how creative they can make their photos look.
- A Swipe is the practice of moving your camera up or down or sideways while exposing. This gives you a linear look.
- With Zooms, you hold your camera still but turn the zoom ring on your lens while exposing. This gives you a circular look.
- A Swirl is when you rotate your whole camera, giving you a spinning look.
- A Jiggle is just that, jiggle the camera while exposing for an impressionistic painterly look.
- Using Multiple Exposures is another technique that can be used to convey movement - take multiple exposures of the same scene, with each frame slightly shifted from the previous one as show in the image above.
Let’s look at it in more detail.
Exposure Settings
 Long shutter speeds are key as you need enough time to be able to move the camera. Anywhere from 1 second to 4 seconds works well. Depth of field is not important because most of the scene will be blurred anyway so just use the aperture to control the light. During daylight we may need to use f22 to control it. Additionally, with a long shutter speed, you may need to use the lowest ISO setting depending on the brightness of your scene.
For Multi-Exposures, you expose as you would normally, you don't need a long exposure time for these. Expose as if you were taking a normal hand-held shot.
Filters Can Help
Long exposures in daylight can be challenging because we risk overexposure. Using a circular polarizing filter will help to take away some light (about 2 stops) and that may just be enough but if not, then a neutral density filter (ND) will definitely do the trick. ND filters are available in various degrees of density from 1 stop to 10 stops and it's always good to have a couple of them in your bag.
Techniques
ZOOMS – Press the shutter button while turning the zoom ring on your lens. You may or may not want to zoom the full range of your lens as you might include more in the frame than you want. Conversely, you may not capture enough of the scene and may need to zoom wider. Take a few test shots and decide if you should zoom less or more. It’s helpful to start turning lens before you actually fire the shutter. This will help you to move more fluidly and avoid jerking the camera.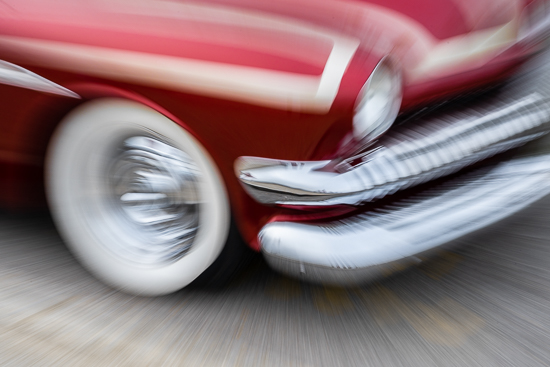
SWIPES – Expose while moving your camera up, down or sideways. How far up or down you move your camera depends on what you want in the frame. If you have a bright or dark area that would be distracting, stop the swipe before you get to that part. Start moving the camera before you actually fire the shutter for a more fluid motion. Continue moving after the shutter fires too for this same reason.
For SWIRLS, it’s good to fill the frame with what you want in the shot and then swirl the camera around staying on the subject. Again, begin moving the camera a little before you actually fire the shutter for more fluid movement.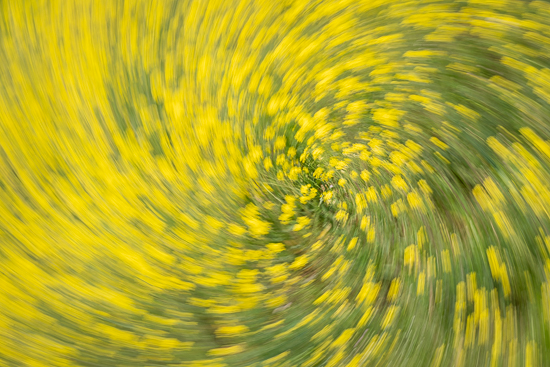 With JIGGLES, frame the scene you want and then slightly jiggle the camera as you expose. This can be done with 1/15, 1/8, 1/4 or 1/2 a second. Longer exposures might make your photo too blurry so these briefer speeds usually work better.
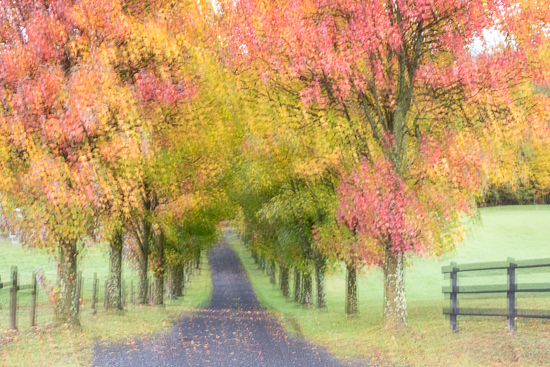
For MULTIPLE EXPOSURES, see if your camera has this setting and if so, dial in how many exposure you want. Try starting with 4 or 5. The camera will blend them together and you'll have a super fun image. If your camera doesn't offer this, capture 4 or 5 frames using the burst mode and then you'll blend those together using Photoshop. 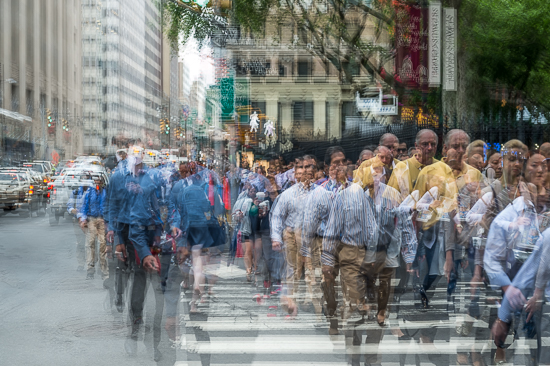
Tripods or Hand Holding
Hand holding is fine for this technique and often times easier but you’ll see that when you’re zooming (as opposed to swiping or swirling) you’ll have a cleaner look with a tripod because only the lens will be moving, not the camera. Try this with and without a tripod and decide if using it gives you better results.
Subjects That Work Best
You can use these techniques with just about any subject: brightly lit night scenes, a city street scene, anything with a repeating pattern, very colorful subjects or scenes for kaleidoscope looking images, trees in a forest, a colorful sky at sunrise or sunset, waves at the beach and the list goes on and on.
So there you have it, a new tool for your photo tool bag. Give these a try and you’ll be capturing photos in a whole new and very creative way!
Image Exposure Settings
1. Yellow Fall Tree - ISO 800 f20 0.5 sec on tripod
2. Bluebells in field - ISO 320 f8 1/10 sec
3. Playground slide - ISO 250 f8 1/8 sec
4. Red car - ISO 200 f22 0.4 sec
5. PInk Crepe Myrtle tree - ISO 50 f22 1.3 sec
6. Mustard flowers - ISO 400 f22 1/20 sec
7. Fall trees on path - ISO 80 f20 2 sec
8. City street people - ISO 200 f5 1/60 sec
9. Trees - ISO 250 f22 1.3 sec on tripod
10. Night fair - ISO 100 f8 2.5 sec on tripod
11. Tulips - ISO 80 f22 0.5 sec