Editing Between Lightroom and Photoshop
October 1, 2014 by Timothy Cooper
 Although Lightroom’s Develop Module is extremely powerful there are plenty of reasons that you would need to take our images into Photoshop. First and foremost is the ability to very accurately enhance local areas of an image.
While Lightroom’s Graduated Filter, Radial Filter, and Adjustment Brush are quite robust, they pale in comparison to the capabilities of Photoshop. For exacting adjustments, we’ll need to head over to Photoshop.
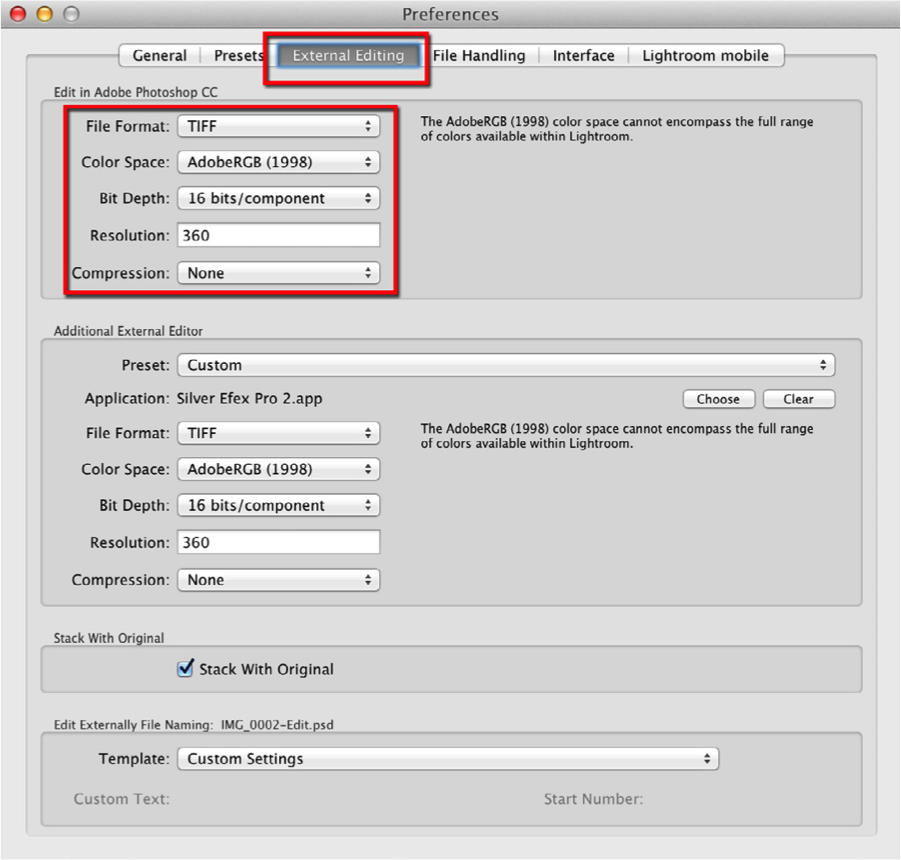
Adobe has made exporting images from Lightroom to Photoshop and back again snap! A trip to the Preferences panel will ensure that we are sending the desired type of document.
In Lightroom on an Apple choose Lightroom>Preferences>External Editing. On
a PC choose Edit> Preferences>External Editing.
Set your preferences as seen in the screen shot. These settings will provide a high quality 16 bit file to be sent to Photoshop. Use 360 in the resolution if you are using an Epson Printer. Use 300 if you using any other type of printer. 
Sending to Photoshop
To send your image to Photoshop, begin by navigating to the Library module in Lightroom and selecting the image you wish to export to Photoshop.
Choose Photo>Edit> Edit in Adobe Photoshop CC…
If you are exporting a Raw or DNG file, Lightroom will automatically create a copy of your Raw image and send it over to Photoshop. If you are exporting files that are not Raw, you will be asked “What to Edit.” Your choices will be:
1. Edit a copy with Lightroom Adjustments
2. Edit a copy
3. Edit Original
Lets take a closer look at the meaning of these choices.
1. Edit a copy with Lightroom Adjustments - applies your Lightroom Adjustments to a copy of the photo you have selected and sends that copy over to Photoshop. You will not see this choice when sending over a Raw or Dng file. This will be available when selecting Tiff (.tif ), Jpeg (.jpg ), or Photoshop (.psd) files.
This choice flattens layers. Do not use If you wish to continue working on a the layers in a Photoshop (.psd) or Tiff (.tif )document. Use this option if you want to apply your Lightroom adjustments to a copy and send that copy over to Photoshop. 
2. Edit a copy - This choice makes a copy of your Original file and sends this over to Photoshop. Again this choice will not be available with Raw or Dng files. This does not apply any Lightroom adjustments to the selected image before sending it to Photoshop. Use this option when wanting to create a copy of your image.
3. Edit Original - This choice sends the selected image to Photoshop as is. The word Original here refers to the image that you have selected not the original Raw file that it came from.
Use this option when choosing an image that has been worked on in Photoshop and has returned to Light- room. This option keeps your Photoshop adjustment Layers intact.
Common Lightroom to Photoshop Workflow:
1. You make your initial global adjustments using Lightroom’s Develop Module.
2. Next you choose Photo>Edit In> Photoshop… This sends the image to Photoshop. Using the power of Photoshop, you can create layers and adjustment layers to work locally on your image or construct composites etc.
3. When finished choose File>Save. This returns the file to Lightroom.
4. Later, you decide you want to perform some additional editing in Photoshop so you select this image and choose Photo>Edit> Edit in Adobe Photoshop CC…
5. Because you are reopening a .tif file, you are faced with the Edit Photo Dialog Box. At this point you would choose Edit Original. This means you will be editing the .tif or .psd file back in Photoshop with all layers intact.
6. Once again, when finished, choose File>Save, and the file returns to Lightroom.
7. Although you can edit your .tif and .psd files back in Lightroom’s Develop module, I recommend resisting the temptation. Eliminate confusion by returning .tif and .psd files to Photoshop for additional editing. Lightroom, will however still act as that final step in exporting images to web, email, print, etc.
