Long Exposure Photography
May 18, 2023 by Marie Joabar
Long Exposure Photography is all about using a slow shutter speed. Since the shutter speed controls motion, we can slow it or “drag” it to blur anything that’s moving while keeping stationary subjects sharp. We can also use it for playful, creative and dramatic imagery.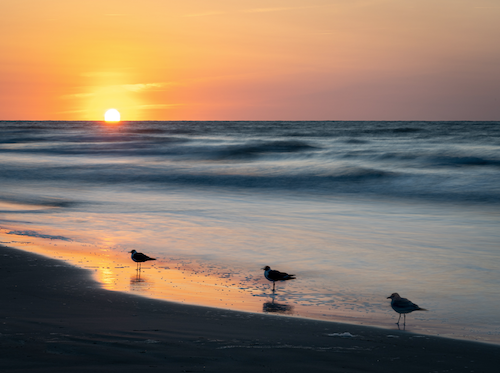
Opportunities for Long Exposures
- To blur moving subjects; people walking/running, car taillights, waterfalls & fountains.
- To smooth water & clouds
- For Panning
- Camera movement for a creative look
This type of photography usually works better in the Manual Mode as everything needs to support the slow shutter speed.
The length of time (shutter speed) is usually 1/10 second or slower. Set this to give you the amount of time or the amount of blurring that you want. The ISO and the aperture support that speed and to help control light.
- Aperture - In low light try f11, 16 or 22. In bright light try f22 or smaller if your lens offers it.
- ISO - Typically 100 is good but you may need 200 or 400 with shorter speeds such as 1/10 to 3 seconds.
Before you start photographing your subject, first, consider what you want the moving subject to look like. Also, how fast is the movement and how blurred do you want it?
Some examples or movement and a starting point for your shutter speed.
People walking: 1/10 - 1/20 depending on how fast/slow they’re walking.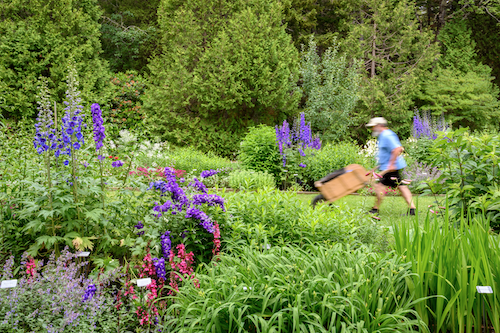
People running: 1/30-1/60 depending on how fast and how close you are.
Waterfalls and Flowing Water. Slow the shutter enough to smooth the water but still see flow lines. If shooting a large volume and/or it’s fast flowing a shorter shutter speed works well. As a starting point, with a fast-flowing stream, 1/4 shutter speed might work well. With a slow flowing one, 1 to 2 seconds may be needed. Experiment and choose the look you want. Most waterfalls and cascades are easier to expose for in the early morning or on cloudy days.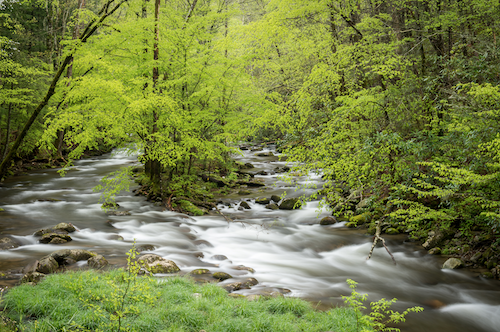
Fountains: 1/10 and slower, depending on volume and speed of water.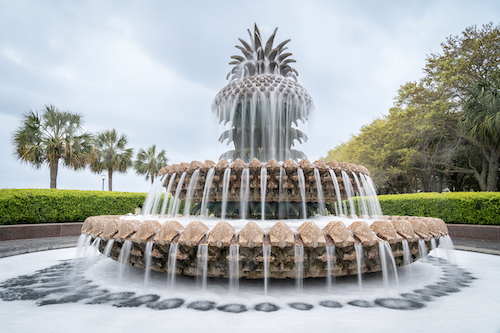
Moving water and clouds: Make choppy water smooth and give clouds an artistic look. 1 to 30 seconds and longer depending on speed of the cloud movement and the choppiness of the water.
Car taillights: 8 -15 seconds or longer. The longer the shutter speed, the longer the streak of light. Anticipate the flow of traffic and wait until it’s moving fast before shooting. Buses give tall streaks.
Panning: Move your camera to follow the subject. It results in a nicely blurred background and a somewhat sharp subject but one thing in the frame should be relatively sharp. The typical shutter speed is 1/30 and you can adjust from there. Hand-holding is easier but you can use a tripod. Find a clean background.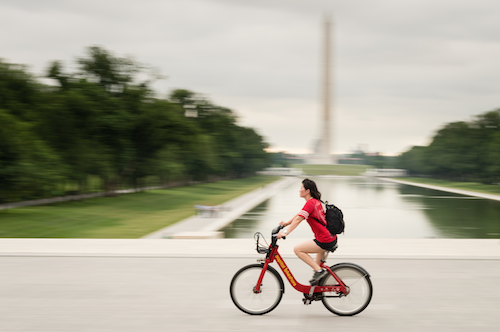
Carnival rides: Ferris wheels, kiddie rides, etc. 1-3 seconds or longer depending on speed of ride.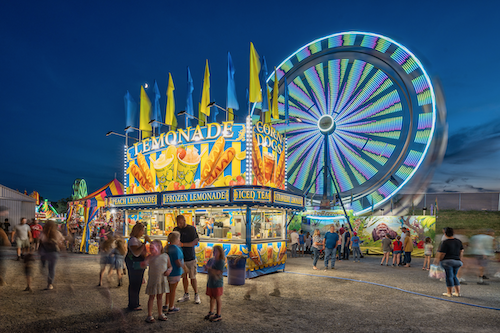
Camera Movement: This is a super creative way to capture photos and is sometimes referred to as Intentional Camera Movement. Basically, you’ll move the camera while exposing. Try it with 1/10 second or longer and try any of the movements listed. A tripod is not required but you’ll cleaner blurring if using one.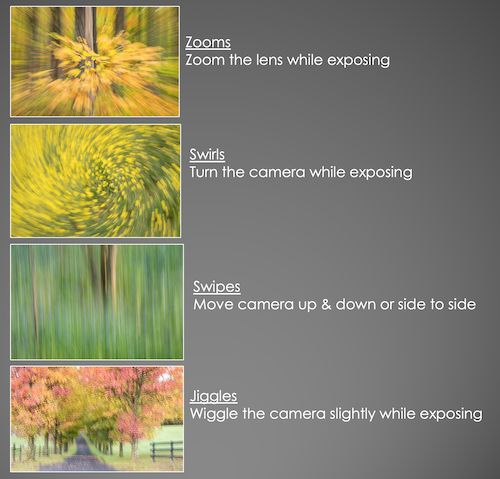
Zooms - Zoom the lens while exposing
Swirls - Hold the lenses Zoom ring and turn the camera while exposing
Swipes - Move camera up & down or side to side
Jiggles - Wiggle the camera slightly while exposing
With practice you’ll get to know which shutter speeds work best for the look you like. After time, you just remember the starting shutter speed and then adjust from there.
Filters To Help Avoid Overexposure
Using slow shutter speeds in daylight can cause overexposure but Circular Polarizers and Neutral Density filters help prevent that. Use these with waterfalls, cascades and fountains for the silky looking water. Also use them to blur moving clouds.
- Circular Polarizers - Take away 2 stops of light and sometimes that’s enough. If not enough, use darker ND filters. These can be stacked for additional light reduction. A very sturdy and ridged tripod is a must.
- Neutral Density Filters - Use to prevent overexposure with longer shutter speeds. For the landscape photographer, a 6 stop ND filter is typical. This can be stacked with a 2 or 3 stop filter if more time is needed.
If the correct exposure without filter is 1/8 second...
ND2 (1 stop) - could take shutter from 1/8 to 1/4
ND4 (2 stops) - could take shutter from 1/8 to 1/2
ND8 (3 stops) - 1/8 to 1 second
ND16 (4 stops) - 1/8 to 2 seconds
ND32 (5 stops) - 1/8 to 4 seconds
ND64 (6 stops) - 1/8 to 8 seconds etc

The number on the ND filters can be confusing as different brands use different numbers. This chart will help with that.
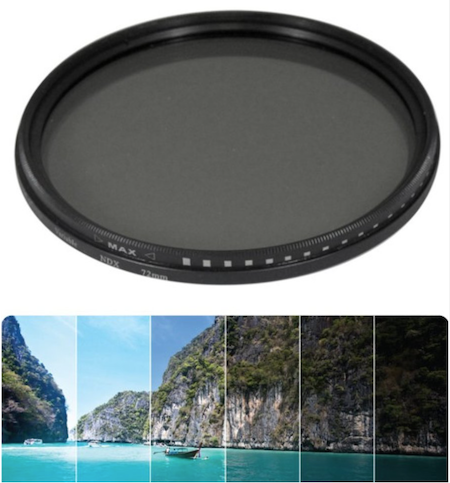 Consider a variable Neutral Density filter, it offers several stops and you turn the outer ring for the desired stop or darkness.
- A Graduated or Split Neutral Density Filter, can be used to darken a portion of the photo. For example, use to darken the brighter sky but not the normal or darker foreground.
Hope you have fun exploring this technique as another tool in your photography tool box!