Metering Modes For Better Exposures
July 12, 2018 by Marie Joabar
 Choosing one Metering Mode over another helps us capture better exposures without so much trial and error.
The meter measures the light and determines how much of it is needed for the proper exposure. The metering mode determines which part of the frame the camera analyzes to calculate that.
HOW CAMERAS METER LIGHT
Today’s cameras have sophisticated light meters which measure the light reflected off the subject. They are standardized based on the light that would be reflected from an object that is middle gray in tone (the halfway point between white and black) or having 18% reflectance.
Many subjects reflect the same amount of light as medium gray, for example, blue sky, green grass and red bricks also have 18% reflectance and can be used to zero out the meter scale.
The majority of cameras do a pretty good job with exposure most of the time. However, aiming the camera at any object lighter or darker than middle gray (or having 18% reflectance) can fool the meter. Metering off a white or black subject, or bright or dark scenes usually causes under or over exposure.
- With a white subject, (a snowy white field) the camera reads the amount of brightness reflected and determines less exposure is necessary. The result is an underexposed, washed out image. If you have photos of gray snow, this is why. To correct for this, increase the exposure by 1 to 2 stops.
- Conversely, with black subjects or very dark scenes, (a black horse inside a black barn) the camera reads the darkness and determines more exposure is needed. The result is an overexposed, flat looking image. To correct for this, decrease the exposure by 1 to 2 stops.
Tricky lighting situations such as backlit scenes also fool the meter and changing the metering mode will help avoid exposure problems in those cases.
METERING MODES
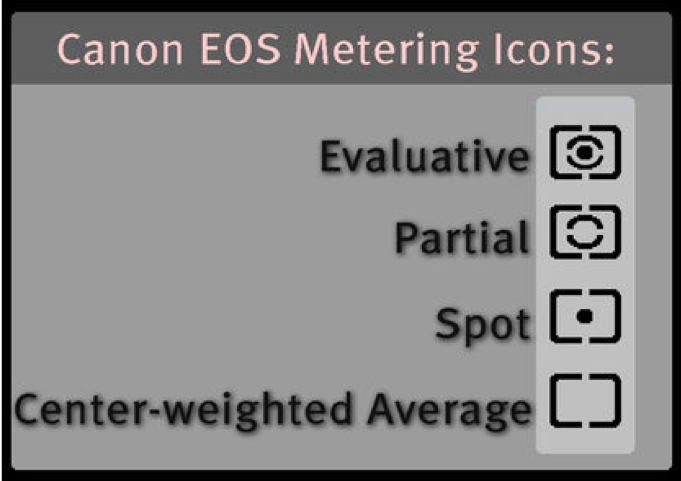
Most DSLRs and mirrorless cameras offer three metering modes, some Canons have four:
•  Multi Segmented Metering (sometimes referred to as Matrix (Nikon and Sony), Evaluative (Canon), ESP (Olympus), Honeycomb (Pentax) is the default setting on cameras. This system of metering reads the light in the entire frame and selects the exposure by averaging the bright and dark tones. This is best for general picture taking or when the scene has an even amount of both bright and dark areas.
•  Center Weighted Metering reads the reflected light throughout entire frame but puts extra emphasis, or weight, on the center. This is great to use for portraits or for scenes that are made up of similar tones or that are evenly lit.
•  The Spot Meter reads the light in a very small portion of the frame and sets the exposure based on a single, circular area (about 2 to 10 percent of the total area) and is not influenced by surrounding areas of light or dark. Typically, the focus point is the spot meter point. This type of metering is useful for bright backlit scenes or scenes made up of different amounts of light, for example, a black cat in a dark room with just a small beam of light illuminating its face. Or dark brown horses in a field of white snow, moon shots (bright white moon in dark sky), etc.
• Partial Metering (offered on Canon cameras) is similar to spot metering but is a little easier to use as it offers a larger area, about 6 to 10 percent of the total area.
Choosing a small metering mode such as spot or center weighted can help us capture the proper exposure for the most important subject of your scene.
To test out how these metering modes work, take an image of an interior room with a view out the window on a bright day. Set the focus point for a subject out the window, also, make sure to include the interior as well as the bright scene out the window. Try each of the metering modes and you’ll see different results and exposures for each.
EXPOSURE MODES
When we shoot in Aperture or Shutter Priority modes, we choose only 2 settings; the ISO and either the shutter speed or the aperture. The camera sets the third value so the meter reads zero. To adjust the exposure your options are:
- Use center weighted, spot or partial metering to target the exposure for the most important subject in the frame.
- With the default Matrix or Evaluative metering, you override the camera’s metered exposure setting by using Exposure Compensation to make the image brighter or darker.
- Another option is to fill the frame with the most important part of the scene and then lock exposure and recompose. (See your manual for Exposure Lock).
In Manual Mode, we set the ISO, the shutter speed and the aperture until the meter reads zero. Then we review the image and decide if we need to make the image brighter or darker and if so, we adjust one of those settings. As we learn more about how our camera measures light, we’ll learn that brighter subjects should have a meter reading toward the brighter side of the meter scale (the + side) and darker subjects should read toward the darker side (the – side).
Remember, the light meter in our camera is trying to make everything middle gray but changing what area it is metering will change the exposure. The more we understand about how our camera measures light, the better we’ll be at capturing the best exposures.
