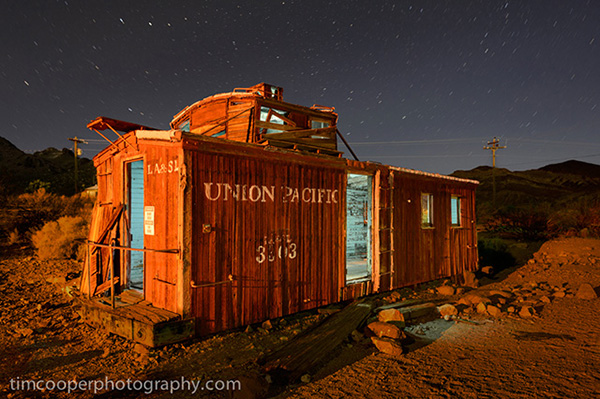
Painting with Light
February 27, 2013 by Timothy Cooper
 I first learned about painting with light over 20 years ago in one of my early photo classes. Surprisingly, not much has changed since that time. A fascinating mix of painting and photography, illuminating your subject with a flashlight is an extraordinary amount of fun.
The glowing results of Light Painting might suggest a complicated and time consuming process, but with a few hints and little practice, you will be making masterpieces in no time! Due to modern digital cameras, this type of photography is easier than ever.
By definition, Light Painting is the process of photographing at night while illuminating your subject with a handheld device such as a flashlight or camera flash. The use of a moving hand held light creates a look that is nearly impossible to replicate during daylight hours.

You can also mix in the ambient light of the scene for a more layered affect. Your scenes can be partially lit by moonlight, street lights, house lights or entirely lit by your own flashlight! You can use different flashlights for a slight change in color or place colored gels over them for striking changes. Rotating the front bezel of your flashlight spreads or focuses the beam light creating a variety looks to your image. The possibilities are endless!
Unlike many forms of photography, there are very few hard and fast rules that apply to this discipline. Proper exposure is largely based on a trial and error approach. Subject reflectivity, ambient light, flashlight power and distance from flashlight to the subject all influence the resulting exposure.
Begin by taking some test exposures. In many cases, the longest shutter of 30 seconds on your camera will not provide enough time to paint. This means you will need a camera that goes to a shutter speed of “B”, which stands for bulb. To use the B setting you must have a cable release with a lock. Plug in your cable release, set your camera to B and press and lock the cable release. The shutter will now stay open until you unlock the cable release. Exposures can range from 1 second to hours. However, most cameras will start to exhibit too much noise after the 3 minute mark.
I usually start with my aperture at about f8. This is typically the sharpest part of any lens and also allows more time to paint. Keep your ISO at a lower setting such as 100, 200 or 400. If the scene is completely dark with no ambient light, then only your flash light will illuminate the scene. In cases like this, you can leave your shutter open for a very long time, 1minute, 2minutes or even 3 minutes.
 If you are mixing ambient light, such as the full moon or street lights, your shutter time may anywhere from 30 seconds to a couple of minutes. My recommendation here is to take some test shots without painting. Get your ambient light to a brightness that doesn’t overwhelm your scene. Perhaps something a little darker than you might normally use. Set your shutter speed for this exposure and then begin to experiment with different amounts of light painting.
More Helpful Hints
1. Wear dark clothes so as you walk through the scene you will appear invisible to the camera
2. Keep your body in between the flashlight and camera to alleviate recording the flashlight in the scene.
3. Don’t keep your body in between what you are painting and the camera. This will negate the painting.
4. Paint your subjects from the side rather than from the camera. Painting directly from the camera will flatten out the scene while painting from the side adds texture.
5. Spend more time painting the areas you want to highlight.
6. Use a broad beam for illuminating a general area, a focused beam to highlight.
7. Before going out to make masterpieces, test your camera at home. Set up your camera in your home at night and make a series of exposures at 30 seconds, 1 minute, 2 minutes, 3 minutes and 4 minutes. Check your images out on your computer and see where the noise starts to become a problem. Most cameras will look OK up to the 2 or 3 minute mark.
Practice, experiment and have fun!

