Shooting DSLR Video - The Basics
January 19, 2016 by Admin
Did you buy yourself a new DSLR in order to get better picture quality, faster performance and more control when shooting stills? Although quite an investment, you made a good choice. WIth today’s DSLR’s, you not only have the ability to shoot better images but you also have the capability of shooting HD video too.
The idea of shooting video can be a bit daunting at first because you are adding in the whole idea of motion. Your subject can move, you can move… it’s a whole new world.
To get started with DSLR video and develop your movie-shooting skills, here are some important settings and techniques to consider using.
1. Choose your frame size and frame rate
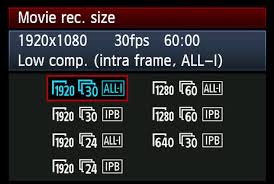
 Your DSLR camera has a range of frame sizes and frame rates to choose from. You can usually find these settings in the menu but only when you are set to the video mode on your camera.
Most videographers prefer to shoot with the frame size of 1920x1080 which captures a high level of detail and is considered HD. Additionally, most TV’s and monitors are set up to handle this ratio so it will look good on a variety of screens.
Frame rate, also known as frame frequency and frames per second (fps), is the frequency (rate) at which your camera produces unique consecutive images called frames.
The recommended frame rate is either 24 or 30 frames per second. There is a lot of debate between the different rates; some argue that 24fps lends a more cinematic and dreamy look to your video while 30 fps is more realistic. To give you an idea of what they look like, films are shot at 24fps while TV or broadcast is shot at 30fps.
From my experience, 24fps is a good balance between smooth motion and file size. 30fps doesn’t offer much more smooth flowing action than 24fps but the file size is considerably larger. In the end, the choice depends on what you want your film to look like. Run some tests at 24 and 30fps and choose based on your preference.
2. Find the Right Exposure
Just as with still photography, you get the most control over your video when you shoot manually. To maintain the film look, you want to set your shutter speed at double your frame rate or close to it. So if you choose a frame rate of 24fps, you’ll want a shutter speed of 1/50th.
(24 fps x 2= 50 or 1/50th ) (30 fps x 2= 60 or 1/60th)
Once you have your shutter speed set, adjust your aperture and ISO to get the best exposure.
It is helpful to activate your on-screen histogram to get a sense of exposure rather than guessing from the LCD screen which is backlit. This will vary based on the tones in your scene but make sure there are no big spikes in the shadow or highlight ends.
It’s EXTREMELY important to take the time and finesse your exposure in camera. With images, you have a RAW format that captures tons of data, allowing you to make changes afterword, such as increasing/decreasing the exposure or increasing tone in shadows or bringing down hot highlights. With video however, you do not have these same advantages. There is no RAW format for video so what you see is what you get and it’s very hard to make changes in editing software in post.
You can try some creative tricks when it comes to shutter speed…
• A fast shutter speed such as 1/400th of a second will produce a series of crisp frames that have a choppy look when played back.
• A slow shutter speed such as 1/15th of a second, on the other hand, will produce a series of slightly blurred frames.
3. Create a Custom White Balance
 White balance should be set to ‘custom’, especially if you’re shooting multiple clips and editing them together. It’s important to maintain color consistency between shots. If you’re just shooting single-take videos like home movies, it’s slightly less imperative but best practice is to manually set white balance before every take.
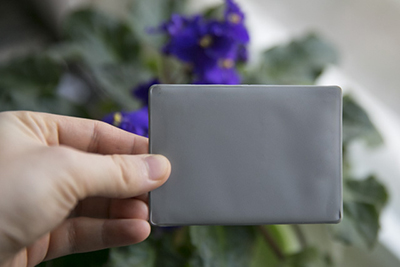
To make a custom white balance hold a white or grey piece of paper or cardboard in front of your camera so it fills most of the frame and take a picture.
In the menu under Video there should be a setting to create a custom white balance. Select the image of the piece of paper and hit ‘set’. The camera will automatically set what it thinks to be the best WB based on the colors and light it saw in white or grey piece of paper. Evaluate this, if you think a scene is too blue or yellow or has a strange cast, choose one of the WB presets instead.
4. Take Focusing Into Your Own Hands
The same two options for focusing are available for video; auto and manual focus. If you do use autofocus, keep in mind that many lenses can be noisy when autofocusing and this will be picked up by the built-in mics. You may be able to hear the ‘whurring’ noise in your video playback.
You could try using a fixed focus approach by setting your focus before shooting and maintaining the same camera-to-subject distance at all times. This is most useful for interview-type scenarios where the subject is sitting and the camera is locked on them.
The other option is continual manual focus; regularly used in filmmaking when both camera and subject are moving around. Learning to manual focus is probably one of the most difficult aspects of video and takes a lot of practice.
You start by composing your scene in camera and then magnifying the subject on the camera’s LCD to see more detail and check the focus. Once everything is sharp, you can change back to normal view on the screen and start recording. You then move your lens’ focus ring based on where the subject(s) are moving in the frame using the LCD screen as a guide.
Practicing focusing on subjects moving parallel to the camera and then move on to subjects moving toward and away from you.
5. Focus Smoothly And Silently With STM Lenses
To have the most flexibility in focusing consider using a STM (stepping motor) lens. These lenses shoot great photos and even better videos because they’re able to focus smoothly and silently when capturing video.
Canon offers a wide assortment of STM lenses in the range from 10mm to 250mm in a mix of zooms and primes. Nikon has just this month announced two lenses with this technology; both are AF-P DX Nikkor 18-55mm f/3.5-5.6 but one offers VR (vibration reduction). They’re the first AF-P lenses from Nikon, with the “P” indicating that the lenses use a stepping motor for fast and quiet autofocusing.
6. Sound is Key
Audio is without a doubt the most overlooked aspect of videography and filmmaking despite it being such an important component of the final product. The best way to get the most accurate and level sound is to use a ‘shotgun’ microphone that can be secured on the camera or to use lavaliere mics, which can be attached to your subjects. However, if you’re just starting out with video, using the internal camera microphone is fine. 
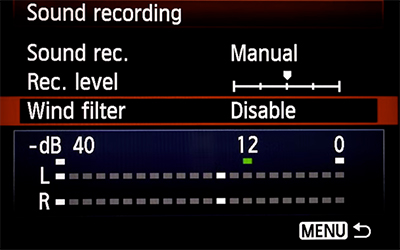
In the menu options, change the “Sound rec.” option to “Manual,” so that you can set the appropriate audio levels for your recording environment.
When this setting is on “Auto” the camera tends to ramp the levels up and down too quickly, making the audio sound strange with an almost echo like effect.
You want your audio to stay around the -12dB marker. Jumping over that means your audio is too high and will be clipped. It’s okay if this happens occasionally during recording, but a constant bump above -12dB is not good.
All DSLR cameras capable of shooting video will have a similar screen for this menu option as the one shown here.
Bear in mind that on most cameras, you can only change the recording volume within the video menu. Once you start taking your video, it’s impossible to get into the menu to change the internal microphones recording volume.
7. Have Fun With It
Photography means “writing with light”, while cinematography means “writing with motion and light.” Video takes a lot more thought and prep work than most photography because video is all about storytelling. You have to think about how your shot will start and end, where the subject will move IF they move at all.
Take the tools you’ve learned in photography and apply the power of those tools to your story structure. Have fun with composition, depth of field, angle of shooting and more. Get down on the ground or get up high, don’t be afraid to allow your subject to move out of frame. You have just as much creativity available, if not more, when shooting video so take advantage of it and have fun!
