The Color Of Light And White Balance Settings
May 8, 2018 by Marie Joabar
If you’ve ever taken a photo and it had a strange color cast, the setting responsible is the White Balance. The White Balance (WB) setting in our camera helps us balance the color of the light we’re shooting under.
THE COLOR OF LIGHT
- Different light sources cast different colors, for example, tungsten/incandescent (like the lamps in our homes) is yellowish orange, fluorescent light is usually green, on cloudy days the light is blue, the light from shade is also blue, and so on. Our eyes don’t usually see the color cast but our cameras definitely do and if we don’t set the right WB we may end up with an undesirable color cast in our image.
- The color of the light (or color temperature) is measured in units of Kelvin. The WB setting takes the color temperature into account and attempts to adjust for the relative warmth or coolness of the light. It’s a handy little tool that can be used to give use accurate color.

GETTING THE COLOR RIGHT
- If you’re shooting under tungsten lights and you set the WB to tungsten (the icon looks like a light bulb), the camera will adjust for the yellowish orange color by adding the opposite color which is blue. The blue will absorb the yellowish orange and you’ll have a color balanced image. However, if you move outdoors and forget to change your WB setting from tungsten, your photos will have a blue color cast to them.
- In the days of film, most film was “daylight” balanced. Great for outdoors but not so great if you were shooting under artificial light. Under tungsten light you would put a blue filter (an 80A or 80B) on the lens to absorb the yellow light. If you were shooting under fluorescent light, you would put a pink filter (FL-D) on the lens to absorb all the green. In both cases once the filter was added the scene was then balanced for daylight. With digital cameras, we can adjust for the color of the light with our WB setting, no need for color correcting filters anymore.
- Look in your camera menu or see if your camera has a WB button and explore what options you have, you could try Auto WB and let the camera figure out the color of the light. Or you could use a preset or you could use the K setting and dial in a Kevin temperature. It might be a good exercise to take the same photo at the different WB settings just so you can see what’s happening. Note - if you’re in any of the Auto modes you might not have access to this setting so take it off Auto to experiment.
- Additionally, some cameras allow you to shift the WB color in one direction or another giving you the opportunity to really fine-tune the color. You could set it to any of the presets and then push it further to the warm side or the cool side, tweeking the temperature and tint. (Look for WB Shift setting.)
- When shooting under different light sources, such as using flash indoors under incandescent or tungsten light … try covering the front of the flash head with an orange gel (CTO gel - color temperature orange). Then set the camera WB to tungsten and the color in the scene is now balanced. If shooting under fluorescent, try putting a green gel on the flash head, set the camera WB to fluorescent to get a properly color balanced scene. Give it a try and you’ll love how easy it is. Some flashes come bundled with colored plastic covers; green for fluorescent and orange for tungsten.
ADJUSTING THE COLOR IN POST-PROCESSING
- When shooting JPEG, it’s critical to get the color right in the camera. Trying to change the color cast in a JPEG file can be difficult and can leave you with an over-processed looking image.
- 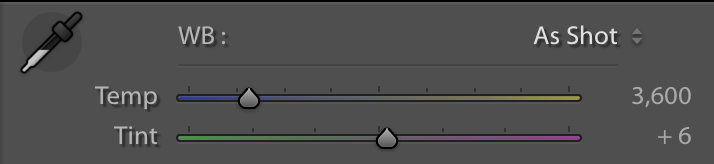 If shooting Raw, this isn’t as much of a concern as a simple slider adjustment allows you to change the WB in a snap without any damage to the file. Of course it’s best to get it right in the camera when you’re shooting but at least you have an easier fix (if needed) when shooting Raw.
- When getting the color right is critical, try using a gray card. Take a photo of your subject with a gray card in the frame. In editing software, you can use the Temp/Tint tool and adjust the color by clicking on the gray card in the frame. It will help you achieve the right color balance in your scene.
- If you have several images taken under the same light, you can correct one image and then sync the other images to the corrected one making color adjusting multiple images an easy task.
USING WHITE BALANCE CREATIVELY
- WB can also be used creatively to make a stronger image and affect the viewer's response to your image by creating a mood and evoking emotions. To warm up an outdoor scene try using the Cloudy setting, using Shade will warm the scene even further. Adjusting it again to Daylight can give you a cooler tone and change the mood entirely. Experiment with Cloudy and Shade when shooting fall leaves or autumn scenes.
If your images are flat, try changing the WB and see if warming or cooling the color of the scene helps, just remember to change it when you move into a different color light. If you want to set it and forget it, try the Auto WB setting, you’ll find that many times it works really well but it's always fun to explore different WB options to see which will help you make a stronger image.