Exposure Bracketing: Why And When We Need It
July 29, 2021 by Marie Joabar
Often when shooting landscapes or cityscapes we’re faced with a scene which presents us with a challenge; How can we capture such a wide range of tones* from light to dark, in the same exposure? Although our eyes can see about 12 stops of light, our cameras can only capture 5.
When we want that full tonal range our only option is to bracket (defined as taking multiple images each with a different exposure setting) and then put them together later with software such as Lightroom’s HDR feature.
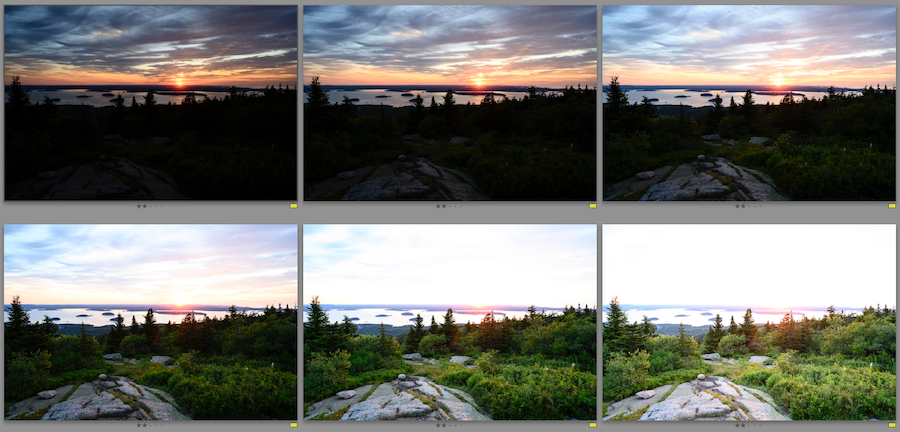 Above is an example where the sun and the clouds are an important part of this composition as are the foreground rocks and trees. We can either make the foreground look good or the sky but not both. If we add light we'll lose some of our highlight data, if we darken it, we'll lose some shadow data. So this is the time to use bracketing.
Let’s look at how to do this.
Use Your Histogram
You’ll definitely need to use your histogram to determine if you need to bracket. After you shoot a scene, look at your histogram, if you see that the data is hitting both ends or even just one edge and you want all of that data, you'll need to bracket. Further information on Histograms can be found on our blog at this link.
Bracketing
- Typically bracketing is done by changing the shutter speed and leaving the aperture and ISO set.
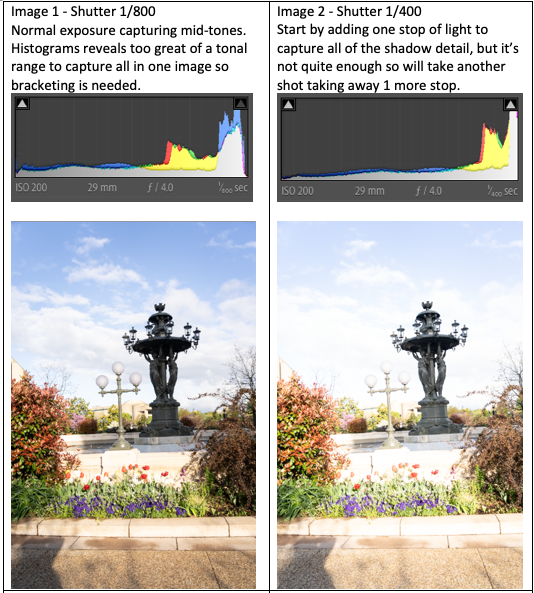
- Set a ‘normal’ exposure. Expose for the midtones before turning on bracketing.
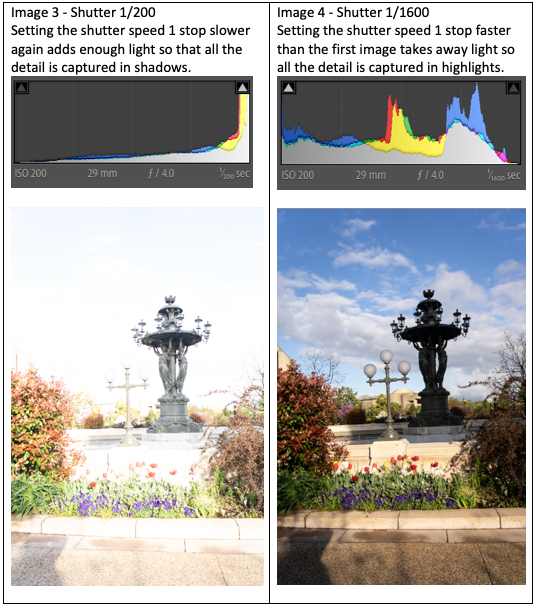
- Then slow down the shutter speed 1 stop at a time (making your image lighter) until the data in the histogram no longer hits the shadow edge. You may need more than 1 stop.
- Then speed up the shutter speed 1 stop at a time (making the image darker) until the data in the histogram no longer hits the highlight edge. You may need more than 1 stop.
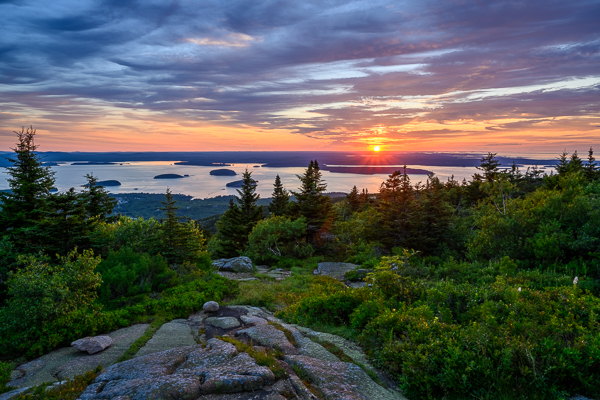
 Below is the final image from the merged bracketed shots, cropped of course.
To Bracket Manually
- In Aperture Priority mode, use exposure compensation set to 0, then to plus 1 or 2 stops, then to minus 1 or 2 stops.
- In the Manual Mode, simply set the aperture, shutter and ISO for a zero meter reading. Then speed up the shutter speed so you have a minus 1 meter reading, then slow the shutter speed for a plus 1 meter reading. You many need to go to a plus and minus 2 meter reading to capture the full range (all the data from light to dark).
To Bracket Automatically
- Try using Auto Exposure Bracketing (AEB) with Continuous Shooting (drive mode) set to high or low speed. When holding down the shutter button, the camera will fire off the number of frames you have bracketing set to. Look in your camera manual to see if you have this option on your camera, most do but some beginner cameras may not.
- Decide if you want 3 or 5 frames, 1 or 2 stops apart. If you’re unsure, better to capture too many than too few.
- Then actually set the bracketing to X number of frames at X number of stops and fire away.
Putting Images Together With Software
Once you have your bracketed images, then use the Merge to HDR feature in Lightroom. It works really well and gives a very realistic look.
- You might choose to use all of the bracketed images or maybe just the middle three, or perhaps the two on the end with the center one.
- Experiment. Try more than one combination and see which you like best. There is no hard and fast rule.
- Merge to HDR first and then do any additional edits you'd like.

*The dynamic range is the range of tones from light to dark. When they exceed what a camera can capture in one frame, it is called high dynamic range more commonly referred to as HDR.
Nerxt time you're out shooting, make sure to give your histogram a look and determine if bracketing will help you capture all that you're seeing with your eyes.