Filters for the Outdoor Photographer
August 2, 2023 by Marie Joabar
 Filters can enhance the look of our images and there are plenty to choose from. Whether you photograph flowers and gardens, beautiful landscapes or dynamic cityscapes, there are a few filters you to consider having in your camera bag.
Let’s take a closer look at these filters:
- The Circular Polarizer
- The ND - Neutral Density filter
- The Graduated or Split Neutral Density filter
- The UV - Ultra Violet or UV-Haze filter
 CIRCULAR POLARIZING FILTER
Think of the this filter as sunglasses for your lens, we’ll use this mainly on sunny days but also when we want to remove glare or reflections.
- When shooting outdoors, a polarizer will add depth and contrast to the sky, making the clouds pop out in more detail and it will add saturation in the reds, greens and blues. This is a great effect for any outdoor shooting!
- Another benefit is that it removes reflections from non-metallic surfaces such as glass, windows or water.
- It also removes glare from foliage increasing sharpness, better color and contrast.
Tips when using the Polarizer;
- Our sky is not evenly polarized, there is only a band of polarization crossing it. On a sunny day, to see the effect of the filter, point your camera at a 90-degree angle from the sun. In other words, put either shoulder to the sun and point your camera forward then spin the outer ring. You’ll see more defined clouds, richer saturation and pleasing contrast.
- To remove glare or reflection on water, glass, or foliage, simply turn the outer ring and you will see the filter reducing glare or reflection.
- To use this filter, put it on your lens and then spin the outer ring. When doing so, you’ll see the filter’s effect on polarization.
- CAUTION using a polarizer with wide angle lenses. Since these lenses cover such a large expanse of sky, the effect is not even. The image will show the sky with the darker band of polarization clearly visible. This is very, very difficult to edit. Consider NOT using a Polarizer when using a lens wider than 28mm.
Instead, in Lightroom Classic, go to the HSL panel, open the Luminance sliders and slowly take the blue slider toward the negative to add a nice and rich blue sky.
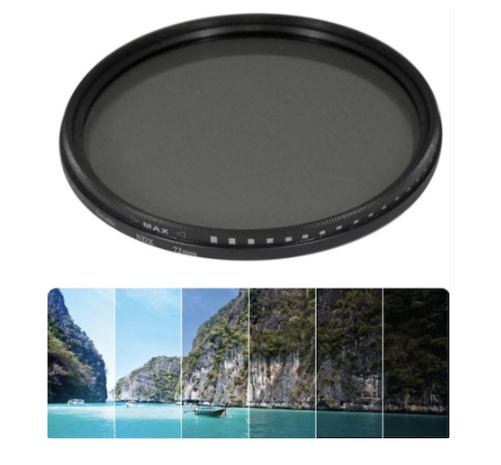
 NEUTRAL DENSITY FILTER
This filter is a dark piece of glass and is used on bright days when we want to use a slow shutter speed, or a wide-open aperture for selective focus.
- When photographing cascades, waterfalls or fountains, the filter will allow you to use slow shutter speeds to blur the water rendering it as a silky flow. Without the filter, there would be too much light, hence overexposure.
Same if you want to use a wide aperture but don’t want to, or can’t speed up the shutter speed to balance the light. - ND filters come in different degrees of darkness (density) measured in stops, 1 stop, 2 stops, etc. and can even be stacked if you need to reduce the light further.
- These can be purchased as ND2(1 stop), ND4 (2 stops), ND8 (3 Stops) ND16 (4 stops), ND32 (5 stops), ND64 (6 stops). * For landscapes, a 6 stop filter is most typical.
- Variable ND filters are another option. By turning the outer ring of a Variable ND, you can adjust the amount of darkness, from 2 stops to 8 stops eliminating the need to carry separate filters of varying density.
*See article on Long Exposures for more info on ND filters and their use. Link at bottom of this article.
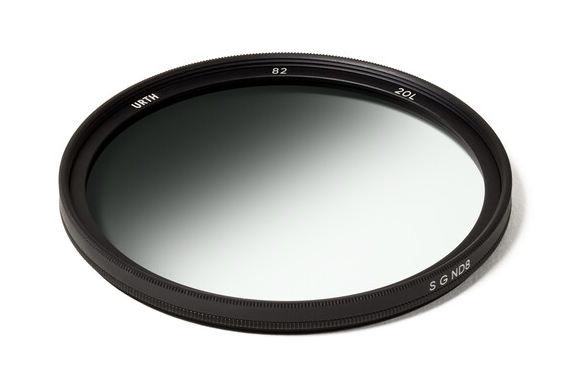
GRADUATED or SPLIT ND FILTER
 This is another version of the ND filter and is useful when there is a dramatic difference between the brightness in the sky and the darker shadow area of the landscape below.
As the name indicates, the filter is divided in two, one half graduating from light to dark grey, and the other half clear. The division is either hard edged or soft edge.
- A “hard” edge filter changes abruptly, good when the difference in light and dark in a scene is clearly defined such as a horizon.
- A “soft” edge is feathered, best for when the change between light and dark in a scene is gradual and
 less defined.
 - Cokin makes a great system for graduated ND filters. It uses a filter holder that attaches to your lens, you simply slide the filter into the holder and look through your viewfinder lining up the division in the filter with the division of light and dark in the scene. For more information on this type of holder and the filters, visit their website Cokin Filters.
A UV (ultra violet) or a UV–HAZE FILTER
 This filter serves a dual purpose. When shooting outdoors with this, the UV light is filtered out. This is great for landscape photography as distance usually causes a haze effect from UV light.
- Additionally, it protects the lens by preventing dirt, dust, and scratches from reaching the front of the lens. Most lenses have special coatings and the best way to preserve lens quality is to keep the front element untouched.
- Protect each of your lenses with a UV filter and leave it on regardless of whether you are shooting indoors or out. The only time you should take it off is when you are using a different filter as it’s best not to stack your filters.
MISC FILTER INFO
- The quality of the glass and the coatings are important and will make a difference. Single or multi-layer coatings improve contrast and help transmit light to the sensor in a straighter path preventing flare and other lens aberrations.
- As with all the filters, the better the quality, the better the image. If you have a $1000 lens and you put a $19 filter on it, you have substantially reduced the quality of that lens. Get what you can afford but if possible, don’t skimp on the glass - there is a reason one filter costs $179 and another runs $29.
- As with any product, some brands are better than others. German based Schneider Optics makes B+W filters which offer the highest quality filters on the market.
- Some camera manufacturers make their own filters and the quality is very good, Canon and Nikon in particular. Singh Ray, Hoya, Tiffen and Urth are just some of the many other brands available. There are even magnetic filters systems, one the well rated brands is Kase, the Wolverine IV system.
- If you have lenses with different filter sizes you can avoid having to purchase a separate filter for each lens by purchasing the filter to fit on your largest lens then using step up rings for the rest. For example, if the filter size of one lens is 72mm and the other lens is a 62, buy the filter to fit the 72mm lens, then buy a 62 to 72 step-up ring so you can use the same filter on the smaller lens. (The exception is UV filters as you should have one for each lens for protection.)
- To determine your lens’ filter size, look on the inside of the lens cap, it should be listed there.
Despite the technology in today’s cameras, they cannot always reproduce the full range in tone and varying amounts of light. That’s where filters come in, adjusting for our camera’s short fall and allowing us to capture what our eyes can see but our cameras are incapable of.
We just added a new class to our line-up which will deal a lot with various filters; Long Exposure Photography on 9/23/23
You might be interested in our Tips for Photographing Waterfalls blog post and our Waterfalls class with Corey Hilz on 8/6
*See the Article on Long Exposures for more info on ND filters and their use.
